|
|
|
|
|
 |
 |
 |
|||||||
 |
|
|||||||||
 |

|
 |
||||||||
|
This short Tutorial is written for those who already have an understanding of layers and the basic tools used in PSP. If you're not too familiar with Animation Shop that's okay - I'll talk you though everything you need to do there.
First open Animation Shop. You need to adjust your General Preferences if they are not set this way already.... In Paint Shop Pro...  Now you'll see that all your frames are visible... so you need to click on the "pair" of "eye glasses" next to each frame in the "Layer Palette" except for frame one. 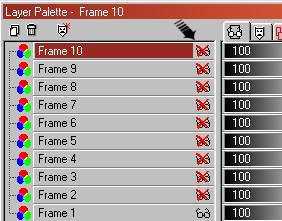 You'll probably need some space to work with so expand your canvas out large enough to include what your adding. It will get "cropped" down later so don't be afraid to add plenty of room. Add your name or button - whatever you'd like to the animation. Your ready to save the frames. With "Frame 1" and the images you added visible....  Once saved - make "Frame 1" invisible by clicking on the "eyeglasses" in "Layer Palette" and click on "Frame 2" to make it visible.  Continue this process till you've reached the last frame. With all the frames saved you can close the animation without updating to Animation Shop. Go back to Animation Shop. Click on the "Animation Wizard", choose "Same size as the first image frame". Click "Next". I always use "Transparent" here but you can use a color for your background. Click "Next" after you've made your choice. I use "Centered in the frame" and check "With the canvas color". "Next". Check Yes, repeat the animation indefinitely. Timing in very important... Start with 30 - 45. "Next". Add Image (browse to the folder where you placed the 1.psp thru 9.psp frames. Click on the 9 hold the shift key down and click on the 1. (If you choose them in order backwards you don't have to rearrange them). "Next". "Finish". Right click on the first frame and choose "Frame Properties". Type in 150. You can play around with the frame rates to make your animation seem more life like. It's a good idea to check the "Frame Properties" in the original animation and duplicate the "Frame Rate" of each frame. Just "Right Click" on each frame and choose "Frame Properties". Once you've got your animation ready to save, press the "Shift" key and z. This will open up the "Optimization Wizard". 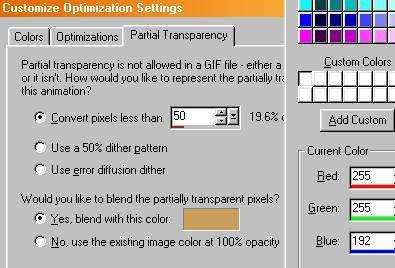 (You can go here and download a free colorpicker. Using a small program like this will give you the Numbers of your background color). This will give you a flawless edge to your .gif. Click "OK" "Next" "Next" "Next" "Finish". It's always a good idea to keep your original frames if you ever plan on using the .gif on a different colored background, especially if your going to go extreme like black to white. Saved for black will not look good on a white background. Great job! If you have any suggestions or questions, please email me. 
|
||||||||||
 |
All rights reserved. |
 |
||||||||
|
|
|
|
|
|
||||||
 |
|
 |
||||||||